When I read this post by the Selfish Seamstress, I knew I wanted to make one of the 1950s outfits she posted. I love the idea that the cape is attached to the buttons on the dress like this one I found a day later on etsy.

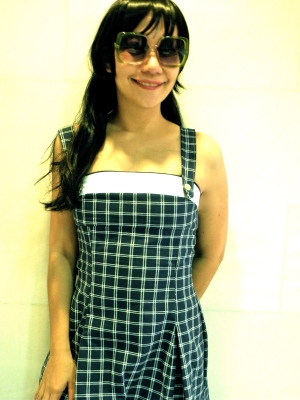
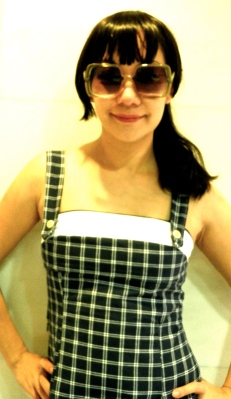
I already have a vintage cape pattern, butterick B5032 pattern, so I didn’t want to purchase another one. Instead, I made the dress out of burdastyle’s Sabrina sewing pattern which I’ve always wanted to try but am arm shy. But with a cape, the outfit is ideal! I would never have thought of this outfit on my own so I am thankful to have seen these vintage patterns. They are my inspiration. I have just completed the dress portion so here it is. I hope you see some similarities 🙂

I used a medium weight ikea fabric in navy blue plaid for the dress, white fabric for what was called the ‘neckline’ on the sewing pattern and added some navy blue piping on top. I love the egg colored buttons which were attached to the front and back of the dress to hold the straps in place.
 Expect lots of sewing for this dress. I have never used this much thread on a dress before LOL and I only realized it when I counted the number of used bobbins. There are princess seams running on the skirt on both front, back and pleat pieces in between. This is my first time sewing a box pleat skirt and I really enjoyed learning something new. I lengthen the skirt quite a bit as the original version was rather short.
Sad to say, the sewing instruction was a total letdown. It was overly brief and confusing for a dress that had quite a number of steps to complete.
 If you bought this pattern, I hope you will find the steps I took below helpful. You can follow burdastyle’s instructions till the end of interfacing and then:
1) Sew the front neckline piece to the front yoke piece (this was not named on the pattern but you can identify it by the bust measurements printed on it), right side facing. Repeat the same for the other front neckline and yoke pieces. Please note that the bodice is very fitting so measure yourself before selecting the size.
2) Sew the back neckline piece to the back yoke piece, right side facing. Repeat the same for the other back neckline and yoke pieces.
3) Sew the front and back pieces together at the side seams for both sets.
4) Sew the two sets together by joining the two necklines, right side facing. You can insert piping here if you wish. Turn right side out, fold in one set of the neckline/yoke set and top stitch the neckline. Fit.
5) Sew the centre front piece and the pleat pieces together, right side facing, matching the numbers. Sew the pleat pieces to the side front pieces, right side facing, matching the numbers. Sew the top of the side front to the centre front, right side facing, matching the numbers until your waistline.
6) Sew the back front, pleat and side pieces in a similar fashion.
7) Sew the side seams on the right. For the left side, sew until the zipper mark.
8 ) Baste top of skirt to one of the bottom seams of the front yoke, matching the side seams. Fit and stitch.
9) Fold in the seam allowance of the internal bodice and iron. Top stitch at the seam.
10) Fold the strap in half and stitch, right side facing, leaving a gap, trim allowance, turn inside out and top stitch. Repeat for the other strap. Pin on marked button spots and do a fitting.
11) Insert zipper and make button holes. Sew buttons.
12) Finish hems and we are done!
I have been procrastinating on the Sabrina for a long long time. There is another reason that gave me a push. The weather here has been anything but predictable recently. I have never witnessed this much rain in June and July! They were supposed to be the hottest months. Can you imagine, these couple of months we actually had a number of flooding incidents! So, I thought this dress with cape would be sort of weather proof- warm or cool. Also, it is perfect for my Sundays. First watching my prince swim at the sunny pool, followed by church service in an incredibly cold auditorium.
One thing though, I find the dress a little bit difficult to remove due to the tight fit at the bust area. But, it’s only a small issue given how comfortable this is when worn! If you use knit, this issue can be easily resolved and you will not need a zipper.

Now, I just have to get the cape done!