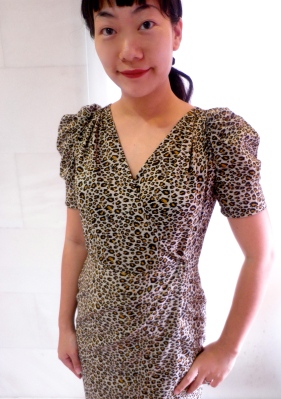
A leopard never changes its spots. Nah!
If you have been reading my blog for a while, you probably witnessed my complaint against gathered sleeves and its over puffiness as well as leopard prints and its potential aging effect on the wearer. Probably things I’ll never wear. But, never say never! After thriving season after season, the animal print has kinda grown on me. And when I saw the sleeves on this dress from burdastyle magazine 12/2010 issue, I knew I had to try sewing these!

Here’s the technical drawing of the dress.

So, as a new year approaches, I thought it appropriate to present the Never Say Never Dress which I made using the wrap dress pattern (102) from the magazine.

The bottom of the inner skirt does a peekaboo here due to the way I am standing but when I stand straight, it hides nicely behind the outer skirt. You will notice that my version has shorter sleeves and a different fit compared to the magazine image.

Before I started making this dress, I was concerned about the fit of the dress as seen on the model. It bodice looked too big on her and that would make a wrap dress very unwearable in reality. So I traced the pattern from the magazine and pinned the pieces against myself to have a better idea of the fit. Turned out, I liked how it looked without the seam allowance. So, I made the dress in size 38, my usual size without adding the seam allowance. 
The leopard print fabric is from fabric.com. The skirt is lined with a beige poly and comes with a facing made with the main fabric. This way, I wouldn’t have to stay away from strong wind 😛
I love the sleeves and all the pleats on the front and back bodice. Here’s a closer look at them 🙂
I am happy with how the dress turned out and am definitely wearing it for a lunch gathering tomorrow. New Year. new dress.
After sewing regularly for around half a year, what life lessons did I learn from sewing?
– There is a perfect sewing pattern for every fabric, it just takes time finding it. Persevere!
– French seams is still the way to go when you have no serger. I am using light weight fabric a lot more nowadays so I can use french seams for the finishing as I discovered that even with pinking sears, fabric would still fray. I have been reminding myself that practicality is paramount so don’t be lazy!
– Never say never. In sewing garments, it is good to throw out some preconceived notions you have and try new things sometimes. Enjoy the adventure and be brave!
– Habits can be changed. I am wearing a lot more dresses now compared to a year ago and definitely wearing made-me garments a lot more often. There is always room for improvement and commitment is key. And off course there is always room for….more dresses 😛
– Encouragements rock! I believe I managed to keep on sewing because of all your comments, kinds words and off course, the support from my family and loved ones. Thank you all so very much!
So, what will I be up to in the new year? I have not done much long term planning but for the month of January, I will be busy sewing for the Lunar/ Chinese New Year which falls on 3 February this year, making outfits for myself and my family.
Have a very happy 2011 everyone! Blessed New Year!!! Have a good one!!!


